nav bar

Image Map

Thursday, February 28, 2013

DIY Save the Date Sign

Hey, hey, hey y'all!  How's your Thursday starting out for ya?  I got to practice with my camera again this past weekend so I thought I'd share a few of my favorite shots with you!  One of my best friends is getting married this September and I'm helping her create some personalized save the date cards.  Her soon-to-be hubby has this sweet little dog that they wanted to include and we thought it would be cute to let him do all the announcing! :) 


Gunner was a SUPERSTAR and was not at all camera shy! He even gave us a sweet little smile!

Ok, before I tell you about the sign, here are just a few more of my favorites from the day...


I love this one.  Even though the focus is totally on the ring, you can just feel the happiness. 

Ok, enough swooning!  Here's the details on that sign!  We have some discontinued siding samples from one of our local hardware stores and it was perfect for this project.  It has a tree bark look and texture.

 This was a last minute thing...I pulled it together the morning of the photo shoot, so I don't have photo's of my process.  Ooops.  Don't hate me...

It's ok.  Remember our Mr. & Mrs. signs??? It's the same process...only backwards.  Stick with me, I'll explain.

Let's break it down:
 
1)  I used my Cricut Machine and some card stock and cut out the numbers
     and the two dots for the date.
2)  Then, I used spray adhesive and sprayed a quick light layer onto my siding
     sample.
3)  I placed my cut-out numbers and dots onto my sticky board.
4)  I used a bronze colored spray paint and gave the board a solid coat.
5)  Then, right away, I VERY CAREFULLY pulled off my numbers and dots.
     (if you wait until the paint dries, sometimes the paint pulls off when you
     remove your letters or numbers)
6)  Go inside and leave it alone while it dries!

Now, you should have a cute little personalized sign!

I had so much fun with Brie, Tim & Gunner!  Can't wait for their special day!

Make sure you check back tomorrow, too.  Charlie and I are starting a new Friday tradition here on B&W.  If you follow us on Facebook, you got a little sneak peak last night.

I would also like to inform all of you that tonight at dinner, Charlie spilled his entire glass mason jar of wine on the floor, on my leg, and on Paisley's white socks!  Remember when Charlie busted me out for dropping that bottle of wine? Well, this was my chance.  I grabbed my phone to snap some pictures and prove that I'm not the only clumsy wino around here, but you should have seen how fast Charlie got that wine wiped up and Paisley's socks removed just so that I had no chance to document it!!!!  Please just take my word for it, ok?  Thanks.

Don't forget to check in tomorrow and see our new addition to the blog.  Thanks for stopping by.  Have a great day!
 
 
Linking Up:


Tuesday, February 26, 2013

Pinterest Party Spring Wreath

Hey friends!  I'm finally getting around to telling you about our Girls Night / Pinterest Party from two weeks ago! I told you a little bit about it during our Dresser Makeover post.  Wednesday nights are a little chaotic around our parts.  Picture this.....5-7 of my best girlfriends, 6-8 kids under the age of 4, and a kitchen full or crafting supplies!  Sounds like a recipe for disaster, right!?!?  Sometimes, yes!  Most of the time, organized chaos that I know my friends and I will talk about for years to come!  It's so amazing to have great friends like we have, and having the opportunity to let our kids grow up together is even better!  So, I'll take the chaos anyday!!!
So we attempted to make some wreaths at our Pinterest Party.  They took a little longer than we had planned.  Well, not really. But, this is how it goes down.  We work on the craft for about 3 minutes then we chase kids, then we work on the craft for 6 minutes and we take away the toy being fought over by the kids, then we work on the craft for 4 minutes and we attempt to feed the kids.  You get the picture?  :) 
We always attempt to keep our projects VERY budget friendly! So for our wreaths we started out with some water pipe insulation.  I picked it up at our local hardware store and it was $1.97 per stick.  It's a little tricky to work with and takes some patience, but they turned out just fine in the end!  Pool noodles from the dollar store would have been ideal, but it's Winter time so insulation it is!
We cut them to the size we wanted and duck taped the ends together to make a circle.  We found that putting the seam to the outside was the best bet (despite the picture below...I learned the hard way!)  Then, insulate your insulation!  We used toilet paper, paper towels, plastic bags...whatever was laying around!  Just keep stuffing until you have a nice solid circle.  This takes a little time and a lot of adjusting so don't get discouraged! 
Here's how mine turned out...
I wrapped my wreath with Chevron Burlap Ribbon.  Ummmmm when I found this in Hobby Lobby, I think I did a little dance right there in the aisle!  Have you seen this adorable stuff!?!? I'm buying more asap.....
I got my little nest and bird at Hobby Lobby also.  I filled my nest with little pearls.
I used some inspiration from Tonya at Love of Family and Home and made some of her cute little felt flowers.
Since the project ran a little longer than expected and all of our kids take up a lot little bit of our time, I didn't get pictures of every one's wreaths.  I had them send me a few pictures so here's what some of my friends came up with too!
                                  
We have some awesome craft nights planned for our upcoming Wednesday night adventures so I'll be sure and show y'all what we come up with!
And, can you believe what you can make with some insulation!?!?
 
Have you guys ever used anything unconditional for your wreath making?  Wreath forms can get so darn expensive!  Spill your secrets, guys!
Thanks for stopping by! Hope you have a great day!

Saturday, February 23, 2013

Country Girl Scarf Organizer

Helllloooo friends!!!  How's your week been?  We've had a sick little girl so it's been a slow week here.  We also got slammed with some crazy snow and ice on Thursday!  I'm ready for spring and for the sickness to leave us alone! 
So anyways, my friend Tonya at Love of Family & Home, along with several of her friends have continued their "Dog Days of Winter" party series.  The upcoming party is all about cleaning and organizing.  We've been linking up to these parties the past several weeks and the party themes are so fun and really get you brainstorming and motivated to come up with a project!  This week, based on the theme, I decided it was time to get my scarf collection cleaned up....

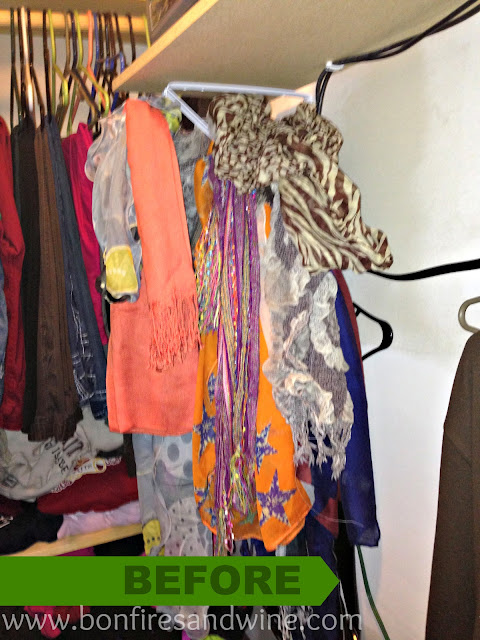
 Ok, don't judge....not all bloggers are organized, OK!?!?  I WILL tackle my closet organization and when I do, I'll be sure and let y'all know! 

When I pull one scarf, it seems like twelve fall to the floor...


Ummmmm, don't pay attention to the obsessive boot collection either.  It's ok...

Sooooo being the country, huntin' folks we are, we decided that a couple antlers, a tree limb and some barn wood, would surely make a great scarf organizer!!!  We have plenty of spare sheds around here so we picked out two similar ones and got to work....

As in "we", I mean "Charlie"... 

This wood was cut straight from a barn. We wanted to keep the nails and knotty look of it.  Charlie cut off the back pieces but kept the original old nails on the front.
Then, we marked the holes for the antlers...
 Charlie drilled out the holes and then screwed them into the barn wood.

The screws were visible so we filled them with some wood glue and then colored them in once it dried.
 Then, we grabbed our tree branch.  Remember how I mentioned we had some crazy icy weather last night, well that didn't help in the "we need a branch for this project and we want to finish it tonight" project! Check out my Instagram for a funny photo on this process...

So, we grabbed our branch and clipped off some of the long pieces sticking off.

Then, we grabbed our rings.  We found these at JoAnn Fabrics.
 We thread them onto the branch.


Then used a little hot glue to attach our branch to our antlers.


I also added a dot of glue to the tips of each antler...

I'll tell ya why a little later on...


Alright, here's our finished project...


I used the rings and the clips, so each ring was able to hold two scarves.


Ok, remember when I showed you those little drops of hot glue on the end of each antler?  Here's why...


The hot glue serves as a "stopper" for my hangers.  This scarf organizer is doubling as my "morning station".  I am attempting to prepare myself for the next morning by having my clothes picked out and ready to go!  (I'm not the best morning person - I'll take all the help I can get.)


Who says an outdoorsy girl can't mix country and fashion???
 Do you guys have a unique way of organizing your scarf collection?  This is definitely my style so I'm really happy with what Charlie came up with!

Hope y'all have a great weekend!  Thanks for stopping by!

 Linked Up:


House of Rose

Wednesday, February 20, 2013

DIY Silhouette Photography

Hey y'all!  Remember Monday when I told you about a quick photography session I had coming up!?!?  Well, it went really well...even though we were freezing!  We were going for silhouette photos, so I had to do a lot of research!  I am nowhere close to being a professional with my camera.  But, it's become a really fun hobby and I love getting the practice!   I set out on a mission to find out how to shoot silhouette photography and you wouldn't believe the resources out there!
Here are a few of the sites I studied up on:
These are the settings I used on my Nikon D3100 with a 35mm lens: 
SS 1/80   F10   200 ISO
This was my first attempt at silhouettes so it was really a trial and error session.  Plus, your best setting for these photo's are sunset or sunrise.  You want all of the light coming from behind your subject and minimal light hitting your subject from the front.  So, once the sun starts to set or rise you literally have minutes!  I was shooting quickly and glancing at my screen as we went.  From what I could tell, they were looking great.  When I got back to the house and started editing, ideally the photo's would have been a little darker.  However, it was nothing a little PICMONKEY editing couldnt' fix!  I uploaded my photo's and used the exposure tab to adjust the shadows darker and the highlights brighter.  They turned out great after a little tweaking!  But, remember....I'm no pro.  Do your research and practice until you get the right shot! :)
Ok, enough of all that...let's see some pictures!
I was happy with how they turned out for my first attempt, and I think Autumn was too!  Now, if that little baby would just hurry up and get here! 
Thanks for stopping by!  Hope you have a great day!
Linking Up:
 

Monday, February 18, 2013

Spring Table

Happy Monday friends!  How was your weekend?  We had a low-key weekend.  We did a little shopping, a little cleaning and a little crib-lowering.  Now that Paisley is pulling up on everything, it was time to lower the mattress! I also got around to finishing up my Spring Table and I can't wait to show it to you!

I went with a simple, natural look.  I saw some cute burlap silverware holders on Design, Dining & Diapers and thought they would look great with my spring decor.  They are super easy and quick to make.  I just cut out a strip of burlap ribbon and folded up the bottom.  Then used a line of hot glue on each side. 


I used my old Root Beer Crate as a centerpiece and made a "Spring" banner for the front.  I used scrapbook paper and letters, and a little jute to hang it.


I used a pretty white pitcher and filled it with fake blue hydrangea flowers.  Because really, you can't go wrong with hydrangeas! Something about them just screams happiness and springtime!  


Have you ever crafted with beans? Yes, I said "beans"...

See that cute little round ball in front of the pitcher?  That's a Styrofoam ball covered in LIMA BEANS! I made this awhile ago so I don't have a tutorial.  But, you seriously just hot glue the beans right onto the ball!


Next to my pitcher I used a cute little stool and birdie...

And a lantern...


 Which had a fake candle in it! Shhh..don't tell!


These sweet little birdies are actually salt and pepper shakers!

And now for the whole table....!!!!


One last overview... :)
 Thank you so much for stopping by today!  My hope is that if I prepare for Spring just a little bit early, it will come just a little bit faster!  It's nasty and rainy here in Southern Illinois so I'm hoping for some sunshine tomorrow!
Remember my cute little prego friend from our "Mommy To BEE" post?  Well she's having that sweet little boy this week and tomorrow night I get to take some silhouette pictures for her! I am so excited to see how they turn out and even more excited to meet little Rylyn!
Hope y'all have a great week!
Related Posts Plugin for WordPress, Blogger...