nav bar

Image Map

Wednesday, January 30, 2013

Freezer Smoothies

Hey guys!  Hope you've had a good day!  Remember when I told you about pinning healthy recipes? Well, I really love smoothies. Like, I love, love, love them.  But they always seem to be a hassle.  Getting out all the ingredients, dirtying that huge blender and making such a mess.  I dreamt of making the biggest batch of smoothies ever and having them ready within minutes of my craving, without creating all the mess.  So, I got to thinking.  We have a Food Saver and Charlie and I have been making all of Paisley's food ourselves, then storing it in the Food Saver bags.  We figured there's no reason why it shouldn't work just the same with smoothies!
 
I got out my fruit, milk, yogurt, and sugar and made a giant batch of smoothies.  Charlie helped me pour a cup full at a time into our Food Saver bags and seal them.  The giant batch made 7 bags and we put them right in the freezer!  The next night I took one out of the freezer that way in the morning it would be ready to go.  The next day I woke up and went straight for my smoothie....IT...WAS....PERFECT!!!  And, soooo quick!  And, the best part...no mess!
 
Wanna make your own?  Here's our recipe...


FREEZER SMOOTHIES
 
A lot of fruit - We used Wal-Mart brand, bagged mixed fruit 64 oz.
3/4 cup milk
1/4 cup of Greek Yogurt
1/2 cup Splenda/artificial sweetener
 
Blend everything and pour into bags for freezing.  It's that simple! 
 
 I have to admit...I am NOT a chef.  I added the ingredients slowly and sampled until I was happy with the taste.  The measurements listed above is what I ended up with.  Definitely taste test and decide what works for you!
 
Our giant batch made a week's worth of freezer smoothies!
 
 
This is how my smoothie looked the next morning!
 
AHHHMAZING!
 
 
Have you experimented with make ahead / freezer recipes?? I'd love to know what you've tried!  We're always looking for new ways and recipes!
 
Thanks for checking in! Hope you have an awesome day!
 
Linking up:


Monday, January 28, 2013

Mr. & Mrs. ~ DIY Sign Tutorial

Hey Y'all!  Happy Monday!  How was your weekend?  Ours was pretty jam packed.  Miss "P" had her 9 month photo shoot, we went to a benefit for some of our best friends, Charlie went to an auction and scored some awesome deals, we started plans for a little furniture make-over and we even found time to catch up with friends from out of town!  It was a GREAT weekend!
 
We also managed to put together a little something for our master bedroom.  We showed you our Flea Market Lamps last week and this week we added some Mr. & Mrs. signs!  Here's how we did it...
 
 
 We started with two pieces of scrap wood.  (my favorite barn wood)


I used my Cricut machine and some vinyl to make a stencil.  I cut out the letters and stuck them to my boards, making sure there were no gaps.  Then, I just painted over my stencil.  Once it dried and I pulled off my vinyl stencil I was left with my perfect letters!  But, who really likes perfect anyways!?  I quickly grabbed some sandpaper and got busy distressing!
 
 
We're still working on some Master Bedroom projects, so you'll only get a few shots here... :)


What do ya think!?  This was a quick and easy project that I think made a big impact for our bedroom. 
 
Thanks for stopping by!  Hope you have a great day!
 
 
 Linking up:


House of Rose
 
Skip To My Lou
Between Naps On The Porch
 Craft O Maniac
DIY Showoff
The Girl Creative
Keeping It Simple
Monday Funday
The Better Mom
Under the Table and Dreaming
Homemaker on a Dime
Domestically Speaking


Friday, January 25, 2013

Hello Facebook...

We've been waiting for the right time to launch our Facebook page.  It seems like when you're "waiting for the right time", the time will never come.  Who's to say when the time is "right"!?  Well, we decided no time was better than another, so our Facebook page is now live!  Stop by and check us out and of course "like" us while you're there!  We're pretty excited about connecting with everyone in another new way!  We'll be sharing post updates, other favorite blog features, and whatever else comes to mind!  Check it out and let us know what you think!


Thanks for stopping by! Have a wonderful day!
 
Linking up:


Wednesday, January 23, 2013

Low Fat Chocolate Chip Oatmeal Cookies

I've been attempting to PIN healthy meal and snack options on Pinterest lately.  Who's with me?  It's that whole "New Years Resolution" crap I guess.  Anyways, I came across this LOW FAT, Chocolate Chip Oatmeal Cookie Recipe on the "Baking Bites" blog and just had to try it out.  I really love oatmeal raisin cookies, but Charlie despises of them!  So, they never get made in this household.  I decided that needed to change as soon as I found this recipe. 

Let me tell you how I found it.  I had pinned a recipe for overnight fridge oatmeal that I wanted to try out.  I picked up the oats while I was at the store, came home to get started and realized they weren't supposed to be Quick Oats.  Awesome. NOT!  So I of course went to Pinterest to find a recipe worth saving this accidental purchase.  That's how I landed on this recipe at Baking Bites!


Here's the recipe:
 
1 cup all purpose flour
1 tsp. baking powder
1/2 tsp. baking soda
1/2 tsp. salt
1/2 tsp. ground cinnamon
2 Tbl. unsalted butter, room temperature
1/2 cup sugar
1/2 cup unpacked brown sugar
1 large egg
1/4 cup unsweetened apple sauce
1/2 tsp. vanilla extract
2 cups quick oats
3/4 cup dark chocolate chips

Preheat oven to 350°; line two baking sheets with parchment paper.

In a medium bowl, whisk together flour, baking powder, baking soda, salt and cinnamon. In a large bowl, with a mixer, cream together the butter and the sugars on medium speed.

Add the egg, followed by the applesauce and vanilla extract.

Working by hand, stir in the flour mixture and the oats until just combined and no streaks of flour remain; stir in the chocolate chips.

Drop heaping tablespoonfuls of the dough onto prepared baking sheets, flattening each cookie slightly. Bake for about 10-12 minutes, or until cookies become light brown at the edges.

Let cool on baking sheet for 3 or 4 minutes, then transfer to a wire rack to cool completely.


I really loved the way these turned out!  And hey, who doesn't feel better about eating cookies when they have "LOW FAT" right in the name!?!?
 
Have a great day y'all! Thanks for stopping by!
 
Linking up:
 
 
TheBetterMom.com
My Uncommon Slice of Suburbia

Home Stories A2Z


The Girl Creative

Monday, January 21, 2013

Flea Market Lantern to Bedside Lamp

Hey, y'all......Charlie here again.  I'm finally getting used to recording every step I take of our endeavours, projects we attempt.  These bedside lamps are one of my favorite projects I've worked on in a good while.  The even better part is they were cheap.  We found these old candle lantern lamps, at the Nashville Flea Market (if we haven't told you enough, you need to go check that place out.) I'm not quite sure how old these lamps are but I guess that they were old enough to be used before electricity was a common commodity.  After talking to the seller we were able to get both lamps for $20 instead of the listed $15 a piece.  SCORE!!!


 The lamps frame were originally black.  The color didn't go with our bedroom decor so we chose a metallic bronze color and spray painted them.
 
 
I went to Lowe's and did some looking around in the lamp section.  After some time, I was able to find exactly what I needed.  The best part, the price!!!! Lamp Socket - $2.57,  Threaded Lamp Rod - $1.38, Lamp Cord with Built-in Switch - $4.64!
 
 
Once I got back to the house I couldn't wait to get started.  One problem...I had no idea where to start.  If I happened to mess these lanterns up, it wasn't like I could go back to the lumber yard and buy extras. I started out using a step up bit to make the desired hole I would need.  If you don't own one of these I would recommend it. I am always using this bit for projects.  It eliminates switching out different drill bits.
 
 
The threaded lamp rod came with a nut to secure it to a base.  I drilled the hole a size smaller than the nut and hammered the nut into the wood base so that it wouldn't spin.
 
 
Then, I wired the lamp socket with the lamp cord I purchased.  I stripped the wire insulation back about 16 inches. I wasn't sure if you would be able to see the lamp socket so I painted it as well.
 
 
Then, I ran into a problem.  How could I get the wire to run under the base, but still allow the lamp to sit flat?  I used a circular saw and set the cut depth to 1/4 inch.  I made two cuts side by side and used a chisel to clean the remaining wood out next to the hole.
 
 
  This allowed me to place the wires into the wood base.  I made sure that while placing the wires into this gap, I did not pinch the wires exposing them.
 
 
After the lamp socket was dry I attached it to the threaded rod, and fed the wires through the hollow threaded rod. 
 
 
After several attempts to find the right height, I determined that being a little higher might put off more light into the room.
 
 
Finished!!!!!! For a total of $18.59 per lamp.......I'm pretty sure even my thrifty, "I got it on sale" wife couldn't find a lamp like this at hobby lobby on 75% off day for that cheap!  What I liked best about this project is that Emily had no idea I was turning these lanterns into bedside lamps.   
 
 
I put the lamps in place and turned them on.  I was blown away with how awesome they looked.  I left them on and waited for Emily to come home from work.  When she walked in the door I told her to look for the surprise some where in the house. She had been re arranging the bedroom and immediately went there to see if I had finished it. Let's just say, she had the same look I probably did when I first saw them lit up.  She was even happier when I told her how much I had invested in them!
 
 
There it is.  We're still working on some bedroom projects so we won't be showing off the whole picture just yet.  You'll have to stay tuned for those...
 
 
Remember last week when Em told you guys about the "Dog Days of Winter" parties going on at our friend Tonya's blog, Love of Family and Home?  This week they are doing a "Thrift It" Party and we'll definitley be linking up and partying with these girls!  Make sure you check it out...there are some really cool projects linked up!
 
~Charlie
House of Rose
The Girl Creative
DIY Show Off


Thursday, January 17, 2013

Stripes and Memories...

Hey guys!  How's your week been!?  Charlie and I have been busy this week.  Deciding when to take down Winter themed decor and pack up the snowmen always seems like such a hard decision!  Please tell me I'm not alone!?!?  I'm slowly pulling it all down and replacing it with all the hearts and roses and Valentine's Day Stuff. When do y'all take down your Winter things???

We have been working on our hallway and photo gallery wall for what seems like months now!  At least pics of my sweet baby Paisley will never go out of season!  So we'll get right to it.....
Say hello to our ugly hallway "before"...

Boring. Plain. Tan. Empty Frame. Blah.


Now, say hello to my big mistake...
Helpful hint: ALWAYS make sure you check to see if you need to buy glossy, semi-gloss, flat, etc.
Rookie Mistake


OK, let's just go back to that for a second....do you see that huge splotch of miscolored paint!?!?  How embarrassing!

Fresh paint...ahhhhh


Level and mark...


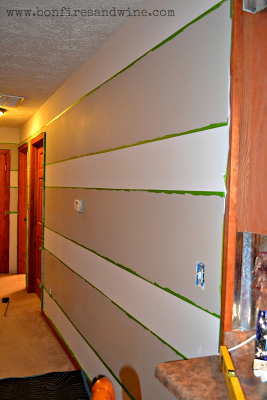
Tape it off....


Paint between the lines...


BE PATIENT!!!  Let it dry overnight, then pull.


Now, stand back and admire...


Hellooooo STRIPES!


I've admired zillions of photo gallery walls on Pinterest and had big dreams of creating our own.  Especially since Miss Paisley joined us.

Our house is pretty open.  You can see this hallway from just about anywhere, so it's the perfect place for our very own photo gallery wall and it's safe to say this is our new focal point!


Ready, set, cue image overload.... 


This "E" came from the Nashville Flea Market.  It was royal blue when we bought it!  It came from an old business sign.  I like to imagine what kind of business it came from...or what city it once looked over...


Our amazing family photographer, Nichole at Whimsey Photography took the majority of these beautiful pictures. 


We wanted a mixture of frames and textures so we decided to make our own canvas prints. 


This big frame is a 3 part version of this one that Charlie showed you how to make last month...


Saddle Up - Hobby Lobby


There it is!  I'm happy with how it turned out and I love seeing all of these pics everyday!


What do you think!?  Do you have a gallery wall in your house?
Thanks for stopping by!  We love having you!  Make sure you subscribe and stay connected with us!
 Have a great weekend!

shabby creek cottage
A Crafty SoireeThe 36th AVENUE
Somewhat Simple


Related Posts Plugin for WordPress, Blogger...