nav bar

Image Map

Tuesday, July 30, 2013

Life Lately @ The B&W House

We've started so many projects lately!  So, I thought we'd take a minute and give you some sneak peaks, since it may be awhile before the final reveals are posted!  

I have spent some time with one of my girlfriends working on her upcoming wedding.  She asked me to help with all of the planning and I couldn't be more excited!

I designed her wedding invites and coordinating info cards in PicMonkey!


Then, we got together and started on her bouquets.  


My house became an all-girl house on Saturday night as we celebrated Brie's upcoming wedding with a Bridal Shower and Bachelorette Party!


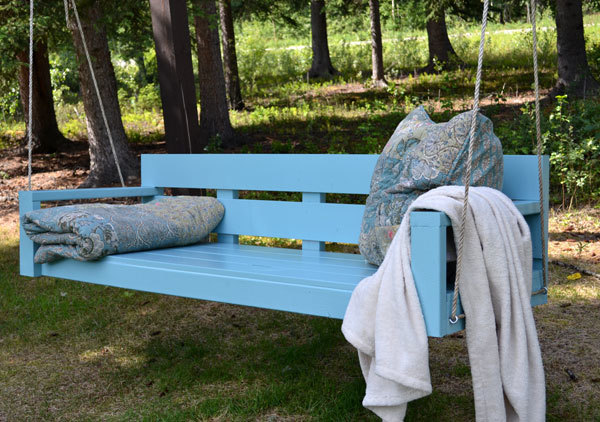
Remember when we talked about my mom's front porch makeover?  And, all of that porch swing inspiration?  Well here's a REALLY BIG sneak peak of that project!  

How awesome is this...???  Cannot wait to finish this project!


If you follow me on Instagram, you may have seen this photo. 
It attacked me.
I almost died.


Friday morning I hit up a yard sale before work and scored this beautiful headboard and footboard.
And I practically stole it at $35!!!


This happened ON MY PATIO the morning of the Bachelorette Party which was scheduled to take place that evening on ON MY PATIO!!!! 

I decided that the guilty one was definitely trying to cover it up...


We've been putting in some major man hours outside trying to spruce up our patio area.  I really should have taken a BEFORE picture.  We had a few bushes planted here and they were completely taken over by grass and weeds.  We dug them up, tilled it up, layed some gardening fabric and replanted them.  We also added some patio pavers.  We still have a little left to do, but you won't believe how much better it looks right now!


And lastly, I love snapchat.  Because while I'm at work all day, I randomly get photo's like the one below and it helps me get through the rest of the day!

HOWDY!


Thanks for stopping by today! Check back often to see the final reveals of the zillions of projects we have going on! :)

Don't miss out on anything! Make sure you're following along!


Thursday, July 25, 2013

Orange & Gray - Office Style

Welcome to my office.  Come on in!  Have a seat!


We recently played musical chairs with our offices.

That basically meant I had a brand new space to decorate!

It was already painted orange and gray (our business logo colors) so I didn't even have to touch a paint brush! <----AWESOME

However, it did mean a long trip to Hobby Lobby was in store! <----- Again, AWESOME! :)

Let's look around, shall we?


This was our first steal!  Seriously from $189.99 to $38.00!!!!


The pictures frames and mirrors were all half off.  


The Shop Local signs I DIY'd awhile ago.  I used an 11x14 canvas and my Cricut machine.  Just like our Mr. & Mrs. signs, you can see the tutorial here


This cool little shelf/storage/hanging concoction was originally marked $110.00.  

Yikes.  

No thanks.

However this specific one you see here...that little piece of wood was not attached on top.

So, some genius at Hobby Lobby thought it was only worth $12. 
SCORE!


I already had the "relax" sign.  The chevron candle and vase were both from Hobby Lobby.

The vase was 80% off, too!

That darn little candle was the only I had in my cart that was full price!

Thank you Hobby Lobby peeps for the amazing thing we call "40% Off coupons".


This was exactly what I needed.  
Just not in RED.  
Black spray paint to the rescue! 


This chalkboard and shelf were also both 50% off! 


Sign - 50% off! 


Even this cute little guy was 80% off!  Seriously, I don't know why it was so cheap or why Hobby Lobby discounts such great stuff down so low, but I AM NOT COMPLAINING!

It's probably because they have to make room for Christmas stuff.  In July.  Yes, in July.   


So, there it is.  
This is where you find me Monday through Friday 8-5!

I really love how it turned out.   And, the whole project only cost about $200!  Not too bad!

When you spend more time at work, then home, I think it's important to love your space.  And, I can honestly say I love my new space.

What do y'all think?  Are you allowed to decorate your space at work?  Or do you have an awesome home office!?!?  We'd love to hear about it!


Don't miss out on anything! Make sure you're following along!


Linking Up:

Love of Family & Home
Crafty, Scrappy, Happy
Chic On A Shoestring Decorating
Not Just a Housewife
My Uncommon Slice of Suburbia
DIY ShowOff
The Shabby Nest
Uncommon Designs
Beneath My Heart
The Shabby Creek Cottage
Sparkles & A Stove

Thursday, July 18, 2013

When something magical happens...

I love my camera.  
I love it even more now that I know how to actually use it.  
(thanks, Tonya!)

What I love the most is that sometimes, just sometimes, when you push that button and you hear that click, something magical happens...


No, I don't mean a baby appears.... :)

I mean you capture this split second.  
Sometimes that split second is the second that changed your whole life.    
The second when nothing else mattered in the whole entire world.  


I think it's those moments and those seconds that keeps my camera attached to my hip, like all the time!

Remember Jen?  This is from her split second.  This moment is all hers.  And, I was blessed to have been by her side the whole way through, witnessing these very moments.  A day I'll never forget.  And now, neither will she.  
I took a few hundred photo's of this special day so she'll definitely never forget! :)

A few days ago, one of my other best friends asked me if I'd take a few pictures of her sweet three year old for her.  

I never, ever turn down a chance to work on my photog skills, y'all!  

And sometimes, even with an adorable little sassy three year old, magic happens...


I'm no pro. 
I'm not even close.
I didn't even tell her to do that.  ^^^ SHE was just that good!
I take a few hundred photo's until I get that shot.  


And even when I get that shot, I do a lot of editing.  
(thanks, PicMonkey)


We happened to catch Princess Haley on laundry day...


Those baby blues...
Gets me every time...


So, that's all the magic I've got for you today.  

Just a handsome little miracle and a sassy blue-eyed princess.  :)

Have a great day!


Linking Up:

Love of Family & Home
Design, Dining & Diapers
Chic On A Shoestring
A Peek Into My Paradise
Lamberts Lately 
Shabby Nest

Tuesday, July 16, 2013

Sweet Summer Sangria

Who doesn't love a nice cold glass of sangria in the summer!?!?


We've mentioned this before (plus it's the title of this little ol' blog), but we kinda like wine.  
It helps that we live in the middle of wine country.
We're so close, we've even rode our 4 wheeler to the winery.  
Yes, we're THAT CLOSE...

We really live in a beautiful area and the wineries around us are so scenic and relaxing!  We even had our wedding reception at a winery just about 2 miles from our house. 


One of our favorite things about wineries is the SANGRIA!
Can I get an "AMEN"???!!!


This past weekend we whipped up a batch of our very own Sweet Sangria.  


You just need a few ingredients.  

You can really pick any kind of wine you want.  We used Flip Flop Moscato this time, but we love using our local apple flavored wine too!

We mixed ours up in a glass pitcher so our amounts are based on what would fill that baby to the rim!  :)

2 1/2 bottles of your favorite wine
1 cup of Pineapple Juice
2 cups of 7up or Sprite
Fresh Fruit 

Ok here's the hard part...

Throw it all in your pitcher and stir. 

NOW, DRINK IT UP! 

No, seriously. 
It's that easy.  

Try it out and see what you think.  You can always add more wine if you want it stronger or more juice or sprite if you want it lighter.  You can't mess this up, folks.


It's got a great sweet flavor and perfect for these hot, humid, sticky, summer days! 


Give it a try and let us know what you think!

Do you have your own Sangria Recipe??  
You do!?!? 
Ummm....why haven't you shared it with us yet???  
You should get right on that...

Have a great day y'all! 


Thursday, July 11, 2013

Swoon-Worthy Porch Swings

I mentioned awhile back that we were in the first stages of a major front porch makeover at my Mom's house. First stages meaning SHOPPING! We've hit up Hobby Lobby a few hundred times and even an auction...or three. We're going for a country chic feel with a black, white and green color scheme. We've found some really great pieces and can't wait until it all comes together.

ONE of the big projects of this make over is the porch swing. You see, my parents have this really great front porch. It's a great size with pretty white spindles and columns. Several windows and even a vintage looking screen door. But it's missing something huge. The one thing every front porch needs. A SWING! 

We have the general idea and design figured out. We're using something special for the building materials. I'll let you sit and think about that until the big reveal! 

 HEY! We can't tell you everything all at once! 

Just like before any DIY project, we set out to Pinterest for a little inspiration. You wouldn't believe all the swoon-worthy porch swings we found out there! 


Here are some of our favorites!


(Source)

I love the sweet little phrase on this swing!


(Source)

This is just plain genius.  Brilliant.


Hanging Daybed Swing
(Source)

I love the use of color and patterns here!  And, make sure you click on the link above to see the other views of this project! BEAUTIFUL!


(Source)

This just screams cozy and inviting! Make sure you click on the link above.  Andrea's front porch is stunning!

(Source)

I love how they took the idea of a porch swing and totally put their own spin on it!

(Source)

These patterns with the white chippy paint!  Love!


Large Modern Porch Swing or Bench
(Source)

Of course, Ana White has a wonderful DIY tutorial on how to make your own porch swing!  That girl can do ANYTHING!


Inspiration overload!  I can't wait to put these ideas to good use and create our very own version of a front porch swing

Which one's your favorite??  

Hopefully next week we'll have a completed front porch reveal for y'all!  Stay tuned! :)


Don't miss out on anything! Make sure you're following along!

Tuesday, July 9, 2013

DIY Toothbrush Holder

Follow my blog with Bloglovin

Hey y'all!  Hope you had a great 4th of July.  We celebrated with friends and family, put on an awesome fireworks show and watched an outdoor movie! We had so much fun!  So much fun, that we needed a little break!  We've been working on some projects, swimming in our new pool, and most importantly welcoming a new little baby into the world.  Remember Jen, my best friend?  She had her sweet baby boy on Saturday and I was lucky enough to be by her side.  It was an unforgettable experience and I'm so honored and blessed to have been a part of it.  A day I know I'll cherish forever.  :)

Alright, so I'm going to show y'all the last (I think?) DIY project from our bathroom remodel project!  We've talked about the big reveal, walked you through the 
plank wall
hand towel holder, 
barnwood vanity light, 
ladder towel storage
our faucet face-lift, 

and now finally, our DIY TOOTHBRUSH HOLDER!


This project was so simple, it barely requires instructions.  Seriously.  It's all about re-purposing the clutter in your house!!!  Sometimes I look around our house and just start picking things up.  I take them and move them to another space or another room as if I'm de-cluttering.  I'm really just cluttering up a new space! haha!  

In this case, we took something old which was really just taking us space and cluttering up an end table, and created a one-of-a-kind toothbrush holder!


Charlie used a hole saw bit and drilled out a few holes in the bottom of our country dreams box.  


Then, we sanded it down and painted it blue using the same paint from our plank wall.  After the blue paint dried, I lightly white washed it using a very small amount of white paint on the tip of a paint brush.  This is the same technique we used while painting the planks and the ladder storage.  

When we were finished, we had a toothbrush holder that matched the rest of our decor and colors perfectly! 


What do you think??? I love how it turned out and you know what I love even more???  This project was FREE as can be!!!  That's the best type of project!

We're hoping to finish up some patio updates and possibly show you Miss Paisley's room soon, so stay tuned!  

Follow along!


Linking Up:

Love of Family And Home
Crafty, Scrappy, Happy
Related Posts Plugin for WordPress, Blogger...