nav bar

Image Map
Showing posts with label Tutorial. Show all posts

Tuesday, May 21, 2013

Girls Night / Pinterest Party - Wine Bottle Tiki Torch {tutorial}

Hey y'all.  I want to start by saying how deeply saddened we are after watching all the news coverage on the tornado that swept through Oklahoma yesterday.  The photos and footage of the damage are unimaginable.  I'm completely terrified of storms.  A few years back, I got trapped in my car while an "Inland Hurricane" tore through Southern Illinois.  I've never been the same since and I didn't go through half of what these people are going through.  I can't imagine the pain and suffering that community is experiencing right now and our hearts are breaking for them.  Our thoughts and prayers are with everyone affected by this tragedy.


(Source)


If you read Finally Friday from last week, you know that us girls got to have a "Mama's Only" girls night this past week!  We had soooo much fun relaxing and crafting without chasing the kids!  

This week, my friend Chelsi organized our AMAZING Pinterest Party craft.  If you follow me on Instagram or Facebook, you got to see a sneak peek!

Chelsi had pinned the tutorial on how to make your own wine bottle tiki torch so we followed their lead and got our craft on!  It was very easy and quick to make!


Here's what we used:

Empty Wine Bottle
Teflon Tape 1/2”
1/2” x 3/8” Copper Coupling -(we accidentally bought the wrong ones and had to get creative to make it work. Make sure you get this exact size!)
1/2” Copper Cap
Tiki Replacement Wick
Torch Fuel 


(Source)


This is what your copper should look like! ^^^^^^

Use the Teflon Tape to wrap the larger end of the copper making it fit snug in the top of your wine bottle. 


Now take your pretty empty wine bottle...


Fill it with your torch fuel and anything else shiny and pretty!  My friend Erin even added a little flare to the outside of her bottle (as seen in the Instagram / Facebook sneak peek!)


Put your Tiki Wick into the copper and place the tape-wrapped copper into the wine bottle.  


Now, light it and admire your beautiful handiwork!!! 

My friend Jessie took hers a step further...She followed the original tutorial to hang hers from her front deck.  


You can see those steps HERE

We put ours to use for the first time on Friday night when we had friends over.  We loved it!  I plan on making some more very soon!  


Thanks so much for stopping by!  See you again soon!

Make sure you're following along!


Linking Up:


Monday, January 28, 2013

Mr. & Mrs. ~ DIY Sign Tutorial

Hey Y'all!  Happy Monday!  How was your weekend?  Ours was pretty jam packed.  Miss "P" had her 9 month photo shoot, we went to a benefit for some of our best friends, Charlie went to an auction and scored some awesome deals, we started plans for a little furniture make-over and we even found time to catch up with friends from out of town!  It was a GREAT weekend!
 
We also managed to put together a little something for our master bedroom.  We showed you our Flea Market Lamps last week and this week we added some Mr. & Mrs. signs!  Here's how we did it...
 
 
 We started with two pieces of scrap wood.  (my favorite barn wood)


I used my Cricut machine and some vinyl to make a stencil.  I cut out the letters and stuck them to my boards, making sure there were no gaps.  Then, I just painted over my stencil.  Once it dried and I pulled off my vinyl stencil I was left with my perfect letters!  But, who really likes perfect anyways!?  I quickly grabbed some sandpaper and got busy distressing!
 
 
We're still working on some Master Bedroom projects, so you'll only get a few shots here... :)


What do ya think!?  This was a quick and easy project that I think made a big impact for our bedroom. 
 
Thanks for stopping by!  Hope you have a great day!
 
 
 Linking up:


House of Rose
 
Skip To My Lou
Between Naps On The Porch
 Craft O Maniac
DIY Showoff
The Girl Creative
Keeping It Simple
Monday Funday
The Better Mom
Under the Table and Dreaming
Homemaker on a Dime
Domestically Speaking


Sunday, January 13, 2013

DIY Chalkboard & Wine Shelf - Tutorial

Hey Y'all, Charlie here again. It's too cold and nasty to be outside working on another project, so football and blogging it is. (Yea, I'm not too upset about that). Remember the Chalkboard and wine shelf project? Well, here are step by step instructions on how you can build your own.....

 
If you caught the post Flea Market Dreams, Emily said how I surprised her with a chalkboard for Christmas. She also mentioned how we saw a large chalkboard at the flea market in Nashville.  But, she did not mention the look on her face when she saw it.  I knew instantly that I would be making a better chalkboard for her as a Christmas Gift.  As she talked to the gentleman who was selling it I played it off as it was to big, we didn't have enough room in the truck, anything I could to get her away from it.  As soon as we got back from our trip I began thinking of how I would make a better Chalkboard.  I began with some research on how chalkboard paint worked on different materials.  I soon learned that magnetic paint and chalkboard paint DO NOT work together.  I made a trip to Lowe's and the journey began...
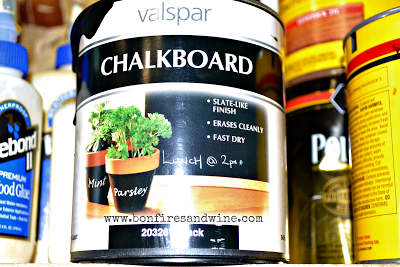
 
Chalk Paint
 
So, like every other guy I could not believe what someone else told me and had to try the magnetic paint and chalkboard paint for myself.  I chose two different chalkboard paints and found that Valspar brand seemed to cover the best.  Also, what I read on the Internet about magnetic paint and chalkboard paint proved true.  Magnetic paint alone does not have a strong hold even with a very powerful magnet.  Once the chalkboard paint is applied it cancels all magnetic paint power out.
 
 
So......being bull headed I still wanted to find a way for my chalkboard to be magnetic.  I started in the heating/cooling aisle and found a piece of flat sheet metal.  It came in a 2ft x 2ft sheet at $9 a sheet. My first thought was to buy two sheets and put a divider board in the middle connecting them, making two separate chalkboards.  I wasn't sold on that idea and went to the metal aisle. I found flat metal that came in 2ft x 4ft size for $25.  This was perfect.  It's a little stronger than sheet metal and I wouldn't have to divide the boards.


Once I got home I prepped the metal for paint.  I used a grinder with a wire wheel to help speed the process.  Be careful when roughing the surface, you just want to give the paint something to bond to. I applied 4 coats of paint to the metal.  I'm pretty sure 2 coats would have worked but the more the better right?  While the metal was drying I started building the frame.  Remember our DIY Photo Frame?  Follow those same steps to make your chalkboard frame.  Make sure you make the frame slightly larger than the metal.


I attached the metal to the frame with an air staple, (most air nailers will accept staples.) The staples will puncture through the metal better than a nail and also provides a better hold into the wood.  Once I completed the chalkboard, I couldn't wait till Christmas to give it to Emily, so she got an early present.  Let's just say the look on her face was better than when she saw the one in Nashville. (Insert self pat on the back!!!)  As soon as I brought the chalkboard in, Emily began searching for the perfect spot.  Soon I found us moving some decorations and a small hutch to make room for our new design.  Once the chalkboard was hung, it needed something else to go with it.  Guess what???? I'm headed back out to the garage to start another project.........


We decided that our chalkboard needed something else to go with it....Wine of course.  So, project Wine Shelf officially began.
 
 
I had some 90 degree brackets in the garage.  These brackets need to be strong enough to hold a good amount of weight. (We have a lot of wine).  I used a stud finder and located the studs, then attached the brackets every 16 inches. 
 
 
Using a left over 1x6x8 I placed it on top of the brackets.  I attached the board to the bracket from underneath using 3/4 inch metal mesh screws.  If you don't have these, I recommend getting them. They are coarse thread and have excellent grip for such a short screw. 
 
 
With the same material as the chalkboard I cut sides to meet flush with the base board and attached them with an air nailer.


I attached a board to the front and nailed to it the base and side boards.  Once this was complete I turned it over to my lovely wife and her decorating talents and this was the finished project......


Now that my job is done I get to sit back and drink some wine, but not for long.  Em & I are finishing up our striped hallway gallery wall. Make sure you stop back by to check it out.  I've also got some ideas for a couple projects that she doesn't know about so it should get real interesting around here in the next couple weeks.  Now back to some football :)
 
~Charlie
 
Linking up!....
 
The Girl Creative  
Funky Junk's Sat Nite Special

Thursday, January 10, 2013

{Surprise} Make-Up Organizer Tutorial

 Hey Y'all.....Charlie here again.  As my lovely wife was running out of the house this morning for work, she kissed the baby good bye and told me to make sure I posted the chalkboard/wine shelf tutorial for you guys.  After the baby was fed, I went into the bathroom and opened the vanity drawer. This is where my wife is a genius. BOOM!!! Right on my big toe falls her makeup box..............


So with the help of my favorite little girl, we started to build mom a makeup organizer that would hold all most of her makeup. 
 
 
I measured the space available under the vanity and realized that I had a leftover 1x10x8 white pine board from another project in the garage.  This would be perfect for two reasons. 1) It doesn't take up room in my garage anymore. 2) I can now tell Emily I don't have any leftover wood for another impromptu project.


 I cut the board into 3 pieces, all 16 inches in length.  This will give you a front, back and bottom for your box.


I used a square and aligned the front and back to get a measurement of 10 1/2 inches for my sides.  I chose to make the box with the sides showing to the front.  I was going for the appearance of an old milk/soda crate and this is how many were built for strength purposes.


I decided to go with a dark walnut stain.  The color also helped make the old soda crate look.  I also used a blow torch to give the wood a weathered look.  It's important to stain the boards before you nail them together so that you can cover them completely.
 

I gave the edges special attention with the blow torch.  If you plan on using a torch with your project, do so before staining.  This will allow you to cover the "black soot" burned wood with the stain color.  Doing this also gives you the antique look . 


I used an air nailer and fastened all the boards together.  If your like my wife, I'm sure this will be filled to the brim of products you didn't even know you had, so the more nails the better.


It was about this time in the project that my little helper had lost interest in working with Dad and decided it would be best to take a nap.  Well played Paisley!!!


 The next step is to decide where you want to install your dividers. 


 Place your dividers into the box and nail all the sides.  Pay special attention if you are using a nail gun that you hit the board on center.  Finish nails like to shoot out sideways if not hit direct. (Ouch)


 This was my favorite part of the entire project.  My little helper decided to wake up from her nap and wanted to help again.  My first thought was to use paint and her hand print.  I don't recommend doing this alone with an 8 month old.  One bath and change of clothes later we decided to trace her hand!!!!!


Well, here is the finished project. Em came home and organized everything into her new makeup box.  (We just won't tell her what I did with the old makeup box that smashed my toe.)


Here's the finished product after she got everything in place.


Stop back later this week and I'll walk you through making your own magnetic chalkboard and wine holder.....
 
~Charlie
 
Linking up! 


Love of Family and Home
Related Posts Plugin for WordPress, Blogger...